
Your Cart
Cart is currently empty!

If you’ve been mixing music for a while, you’ve probably encountered this situation countless times…some frequencies in your vocal tracks are piercing your ear and you can’t quite get them right in the context of your song. Compression isn’t helping and you don’t quite know what to do to tame these harsh vocals. But how do you effectively and musically remove harsh vocal frequencies from your tracks? Here are some tips for you that you can use in order to solve this problem and get better vocal mixes right away!
First, let’s talk about why your vocal tracks sound harsh to begin with. The reason is probably the combination of your singers voice and the microphone and environment in which it has been recorded. In today’s music industry, most people don’t have an array of high-end vocal mics they can test with every single singer they work with. Even if you only record yourself, you probably don’t have the opportunity to test all the microphones out there, just to find out which one sounds best with your voice.
Consequently, most vocals are recorded in a less-than-ideal situation, which – in many cases – leads to general harshness or an over-emphasis on certain unpleasant frequencies. Ok, now you know what the main reason for this issue is, let’s take a look at how you can solve the issue.
There are 3 different ways for you to tackle problematic vocal tracks and remove harsh vocal frequencies in your mixes. They all work in slightly different situations, and oftentimes you’ll find yourself using a combination of these strategies. There’s no better or worse approach. At the end, it’s always about the result, and whatever gets you there is the way to go.
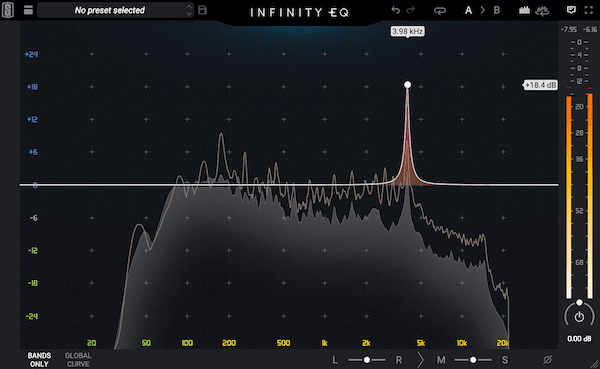
This is the first strategy you should try when there’s one or two distinct frequencies sticking out really strong. Here’s how it works.
One word of caution: you can easily overdo this! Be careful to not remove all the vibe and character from your vocals. If you’re not sure, turn the EQ bypass on and off and decide if you like the result or if you should rather dial your settings back a bit.
Sometimes, all your problems can be solved with a simple De-esser. This technique is most helpful when the highs of your vocals are generally a bit overpowering. In that case, you can put on a De-esser (for example Waves Renaissance De-esser, UAD Precision De-esser, Fabfilter Pro-DS, etc.) and control the harsh frequency as a whole.
Where you set the center frequency depends on where your problematic vocal frequencies lie. You can control the high-mids and highs together if you set the center frequency somewhere around 5k to 6k (again, let your ears guide the way!), and then reduce the threshold until your vocals sound more polished and pleasant to your ears. Be careful not to overdo it or you’ll introduce some unwanted lisping. Your vocalist won’t be pleased…
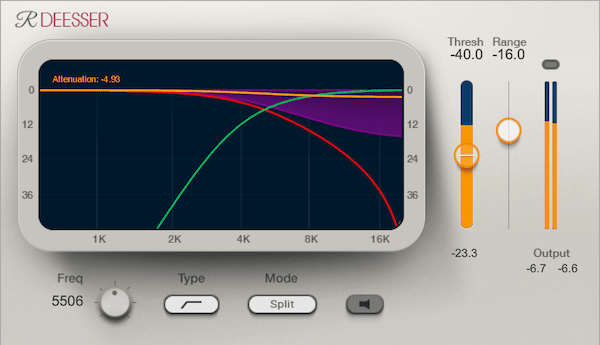
It’s also common to use multiple De-essers in a vocal chain or back to back. Again, whatever solves your problem is the right thing to do. With some De-essers (like the Waves Renaissance De-esser), you can even set different detection modes that might help you get harsh vocal frequencies under control even better.
There are dedicated plugins out there that make your job of cleaning up your vocals a lot easier. Dynamic EQs in general can go a long way, but usually the manual approach is a little more targeted to the situation at hand.
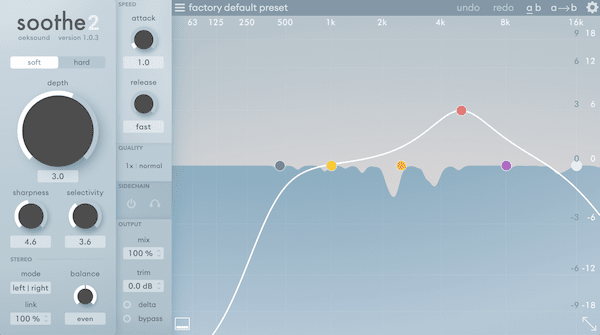
However, there’s one plugin worth mentioning: Soothe2 by oeksound. It’s a plugin dedicated to control uneven signals. The handling is pretty intuitive, although, as with everything we’ve covered in this article, it can just as easily ruin your vocals and your music if you aren’t careful.
There are a ton of helpful presets built into the plugin that can be a great starting point. Even the default setting does a great job in many situations. And it’s safe to say Soothe2 has become a standard for fixing harsh vocals and controlling problematic frequencies.
Sometimes getting the vocal mix right in a song can be difficult. It certainly gets a lot more difficult when your vocals have some nasty frequencies in them that ruin your whole song. At the same time, vocals are usually the most important part of a song. Sure, all the instrumental parts matter and create a huge portion of the whole vibe of the song, but the vocals really deliver the message.
That’s why it’s never a good idea to be lazy with vocals, even if it can be a pain to fix them. The tips outlined in this article can help you get great results faster, and generally end up with a better end result.
Check out this video to see some of these strategies to remove harsh vocal frequencies in action, and start using them in your own mixes!

Working with a clean mix session is the foundation for a great workflow in mixing. Find out how you can prepare your mix session in 7 easy steps.

The internet offers incredible opportunity for you to constantly improve your mixing skills. Find out what you can do to effectively build your skills and find the best information out there!

This is the official complete guide to the flagship compression and tone shaper plugin LOLCOMP by Mixing Night Audio. Find out what all the sliders and knobs do in this article.
Please type in your new password (minimum 9 characters, at least 1 special character).
We’ll send you a code for the next step.